copr-scm
Prolog
Do you have your RPM package sources placed in a publicly available Git or SVN repo? Would you like to build them in the most easiest way and even automate that process? Or are you a developer that wants to get his or her work quickly published? In either of these cases, this article is for you.
Ok, you got my attention
Cool! Well, maybe you have already heard about COPR build system. This is where we will be doing our setup to automatically rebuild your packages. Why there? Because this is the place to make your work public, or if you don’t want that yet, just to test it and share the built rpm binaries with other developers. The linked COPR instance is part of Fedora Project but COPR source code itself: https://pagure.io/copr/copr is distribution independent and if you want you can setup your own COPR instance for custom purposes.
Simple Howto
So let’s dive into the work. Let’s say you have your repo hosted at Github as me here: https://github.com/clime/blog-tutorial-flat-unpacked and you want to make a publicly accessible RPM package that can be very easily installed by users (or fellow programmers). First you need login and create a COPR project dedicated to build your packages. If you haven’t done it before, follow (a bit older) instructions here. Otherwise, let’s jump immediately to the building part:
Picture (click it to enlarge):
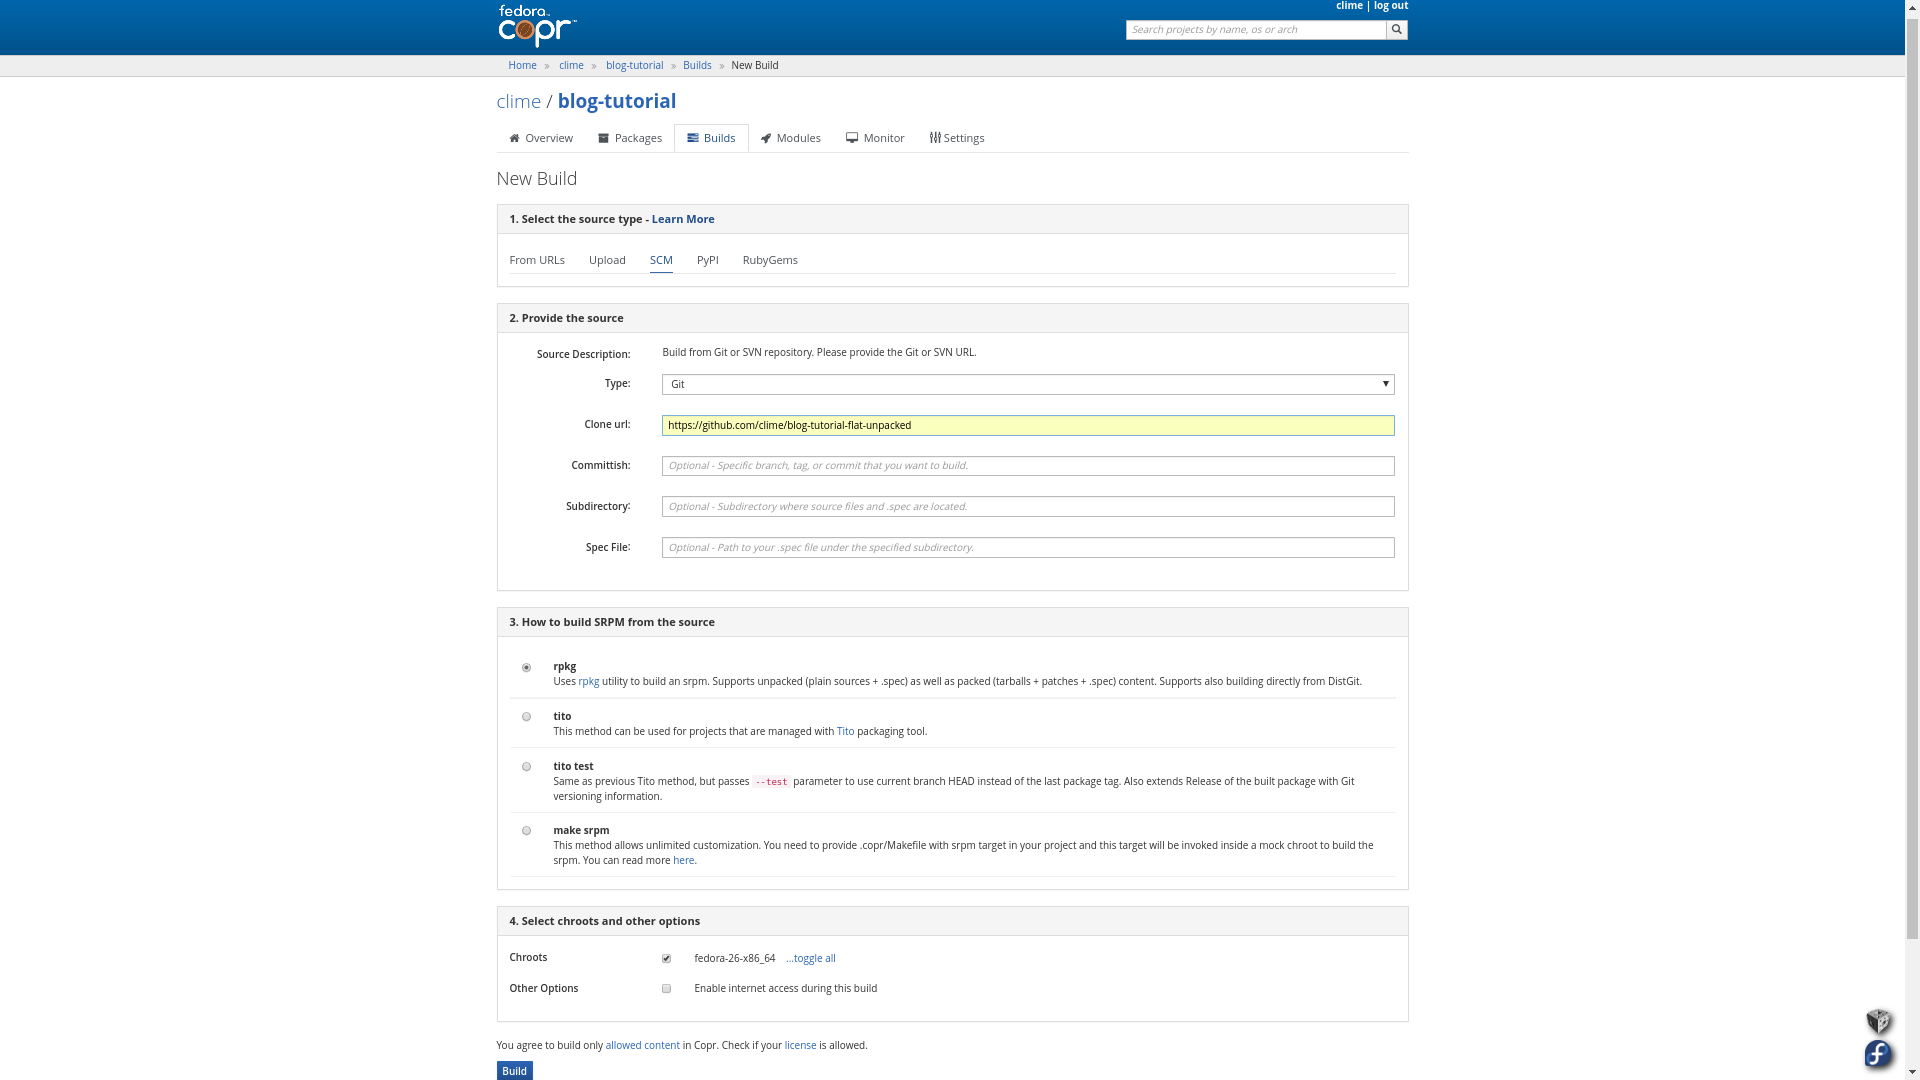
Instructions:
- Go to your project -> click Builds -> click New Build -> select SCM tab
- Insert
<your Git repo URL>into Clone URL field - Click on blue Build button at the bottom
So the basic use-case is really this simple. You just specify Clone URL pointing to your Git (or SVN) repo, leave the rest as is, and click the Build button.
Notice the name of the repository: blog-tutorial-flat-unpacked. Now the same steps will work even for https://github.com/clime/blog-tutorial-flat-packed, yet if you look at the content of the repository, it looks quite a bit different from the unpacked one. COPR supports building from both repository content types and you don’t need to tell it what type it is dealing with. This information is being automatically determined by the rpkg utility.
You can find a real COPR build for blog-tutorial-flat-unpacked here: https://copr.fedorainfracloud.org/coprs/clime/blog-tutorial/build/650291/.
And for blog-tutorial-flat-packed here: https://copr.fedorainfracloud.org/coprs/clime/blog-tutorial/build/656309/.
More advanced Howto
Now if you looked at the screenshot in the section above, you could have noticed that in the section 2. Provide the Source there are many more configuration options than just Clone URL (even though that is the only required one). Apart from boring Type (Git/SVN), there are things like Committish (branch, tag, or git hash), Subdirectory (useful for layered repositories, see below), and Spec File (path to the RPM package metadata file). These things are all optional and if you don’t specify them in the build form, COPR will provide the following default values:
For Type, the default value is Git.
For Committish, the default value is master.
For Subdirectory, it is / (meaning root directory of the Git or SVN repository).
For Spec File, it is name of the file in the given Subdirectory that ends with .spec (in other words, the spec file is auto-located in the given
subdirectory if not specified).
Then there are also two other standalone configuration sections: 3. How to build SRPM from the source and 4. Select chroots and other options. The section 3. allows you to select the tool to be used for SRPM generation (out of rpkg, tito, tito test, make srpm options) and will be covered to the full extent later. Section 4. is shared across all Build Forms and will be covered in a future tutorial.
Ok, we now know the default values for the individual fields in the package source section but what do they actually mean? Let’s see:
- Type: SCM type of the repository being pointed to by Clone URL (in other words, whether we should use plain
gitorgit svnfor subsequent cloning). - Clone URL: What repository we should clone to obtain the sources.
- Committish: What tag, branch, or commit we should check out from the history of the cloned repository.
- Subdirectory: Where the subsequent SRPM build command (see below) should be executed and where the .spec file is located. The path is relative to the repository root.
- Spec File: Path to the spec file relative to the given Subdirectory. Note that you can optionally anchor the path with / (e.g. /rpm/example.spec) to make it relative to the repository root instead of the given Subdirectory.
So what happens if you put the following values into the fields:
- Type: Git
- Clone URL: https://github.com/clime/blog-tutorial-layered
- Committish: feature-branch
- Subdirectory: subpkg1
- Spec File: my.spec
First the Git repository at https://github.com/clime/blog-tutorial-layered is cloned and feature-branch is checked out. Afterwards, the current working directory is changed to subpkg1 and the chosen SRPM generator tool (see below) is invoked with my.spec as an input parameter specifying the package spec file.
Real COPR build: https://copr.fedorainfracloud.org/coprs/clime/blog-tutorial/build/656551/
What about this?
- Type: Git
- Clone URL: https://github.com/clime/blog-tutorial-layered
- Committish: feature-branch
- Subdirectory: subpkg1
- Spec File: /rpm/your.spec
The same repository is cloned and the same branch is checked out. But this time, the SRPM generator will be invoked inside subpkg1 directory and the tool will be fed with /rpm/subpkg2.spec as the path to the RPM spec file.
Real COPR build: https://copr.fedorainfracloud.org/coprs/clime/blog-tutorial/build/656553/
Finally, let’s check out this one:
- Type: Git
- Clone URL: https://github.com/clime/blog-tutorial-layered
- Committish: 22e86970f04a0a48dcebabe237e51064790965c6
- Subdirectory: subpkg2
- Spec File:
Here, we demand that the specific commit 22e86970f04a0a48dcebabe237e51064790965c6 will be checked out and instead of /rpm/your.spec, the spec file inside subpkg2 directory
will be used (after being auto-located based on .spec extension). Using a different spec file basically means a different package with different
content might be built. But this is more advanced topic and you should read more here if you want to get more information
about how to write spec files and what all you can configure in them.
Real COPR build: https://copr.fedorainfracloud.org/coprs/clime/blog-tutorial/build/656554/
Advanced Howto
So far in this tutorial, we have always kept the third section How to build SRPM from the source untouched. That means the default SRPM generator rpkg was used. Let’s remind ourselves of how this section looks like:
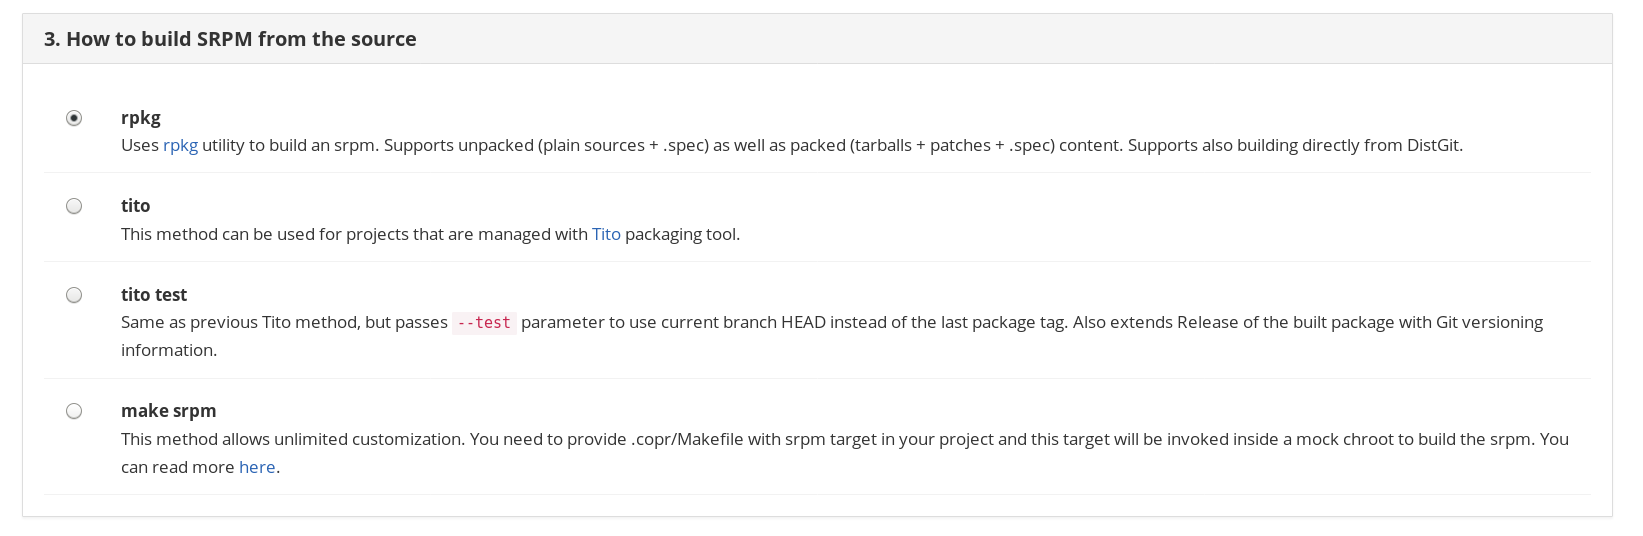
The preselected option should be the most versatile one, allowing user to immediately build RPM package from SCM just after placing a spec file somewhere in the target repository (this is still a required step and yes, it would be nice to achieve automatic spec file generation from SCM repo one day in future).
Apart from building packages from any Git or SVN repository, rpkg also supports building directly from a DistGit repository, which is a variant of Git dedicated solely for packaging purposes. Because Fedora uses DistGit to store its packages, you can build an official Fedora package by using this method. For example, the following will build the official Fedora prunerepo package:
- Type: Git
- Clone URL: https://src.fedoraproject.org/rpms/prunerepo
- Committish:
- Subdirectory:
- Spec File:
- Build SRPM with: rpkg
Real COPR build: https://copr.fedorainfracloud.org/coprs/clime/blog-tutorial/build/656623/
rpkg is actually not only a tool for generating SRPMs but it is, in fact, a full-fledged RPM package manager, similarly to tito (coming next).
tito is a robust RPM package manager with lots of features. If your project is managed with Tito, then this is the tool you want to pick for SRPM generation. Let’s see an example build:
- Type: Git
- Clone URL: https://github.com/spacewalkproject/spacewalk.git
- Committish:
- Subdirectory: spec-tree/bootstrap-datepicker
- Spec File:
- Build SRPM with: tito
Real COPR build: https://copr.fedorainfracloud.org/coprs/clime/blog-tutorial/build/656655/
In this build, Tito looked up the latest Git tag for the subpackage at spec-tree/bootstrap-datepicker and used that specific commit to make an SRPM. This is the default tito mode for creating SRPMs.
Now let’s see what happens if tito test method is selected, which is equivalent to calling tito with --test switch:
- Type: Git
- Clone URL: https://github.com/spacewalkproject/spacewalk.git
- Committish:
- Subdirectory: spec-tree/bootstrap-datepicker
- Spec File:
- Build SRPM with: tito test
Real COPR build: https://copr.fedorainfracloud.org/coprs/clime/blog-tutorial/build/656657/
In this case, tito just builds what is currently being checked out after checkout of the specified Committish (default is ‘master’). But that’s not all to it. If you compare the resulting builddir for the first build and the resulting builddir for the second build, the RPMS are named differently. That’s because in the test mode, Tito fiddles with the provided spec file for the given subpackage and extends Release .spec tag with Git versioning information, which influences the resulting SRPMs as well as RPMs.
Finally, the last SRPM build tool in the shelf is make srpm. This method is the most flexible one. It allows you to e.g. generate a spec file for the subpackage on the fly or even clone other repositories and make SRPM from their content. Let’s stick to a simple example however:
- Type: Git
- Clone URL: https://github.com/clime/blog-tutorial-make-srpm
- Committish:
- Subdirectory:
- Spec File:
- Build SRPM with: make srpm
Real COPR build: https://copr.fedorainfracloud.org/coprs/clime/blog-tutorial/build/656672/
For this method to work, you need to provide .copr/Makefile with srpm target in your project.
This target will be then invoked at a dedicated builder machine inside a mock chroot (see its --chroot option)
by make command. Similarly to other methods, the command will be run in the specified Subdirectory and it will be
provided with two arguments: outdir and spec. outdir says where you should place the resulting generated SRPM and spec will be set to the Spec File field value
prepended with the absolute file-system path to the specified Subdirectory.
Now let’s look at the .copr/Makefile file that we have used in the last build (original is at https://github.com/clime/blog-tutorial-make-srpm/blob/master/.copr/Makefile):
srpm:
    dnf --nogpgcheck -y install rpkg --repofrompath=repo,https://copr-be.cloud.fedoraproject.org/results/clime/rpkg-client/fedora-26-x86_64/
    echo '%dist %{nil}' > ~/.rpmmacros
    rpkg srpm --outdir=$(outdir) --spec=$(spec)
The script performs the following steps:
- Installs the latest version of
rpkgutility directly from a COPR repo. We disable gpgcheck for simplicity so that we don’t need to install the COPR project’s public key. That’s not what you should normally do. - Sets
%disttag macro to%{nil}. This will influence Release of the generated SRPM because%disttag is used from within the Release tag in the subpackage spec file. - Generates SRPM and places it into
$(outdir). The name of the generated SRPM isexample-1.0.8-1.src.rpminstead ofexample-1.0.8-1.fc26.src.rpm.
You can find more information in this log: https://copr-be.cloud.fedoraproject.org/results/clime/blog-tutorial/srpm-builds/00656672/builder-live.log.
Ok, so…how to automate any of that
It’s really not that difficult now. If you make any SCM build in COPR, it will auto-create a new COPR package for you with name inherited from the built SRPM package (unless a COPR package with the same name already exists). It will also copy the field values that you have specified in the Build form into the Package form.
E.g. for the very first build of https://github.com/clime/blog-tutorial-flat-unpacked repository that we have made in this tutorial, it created this package:
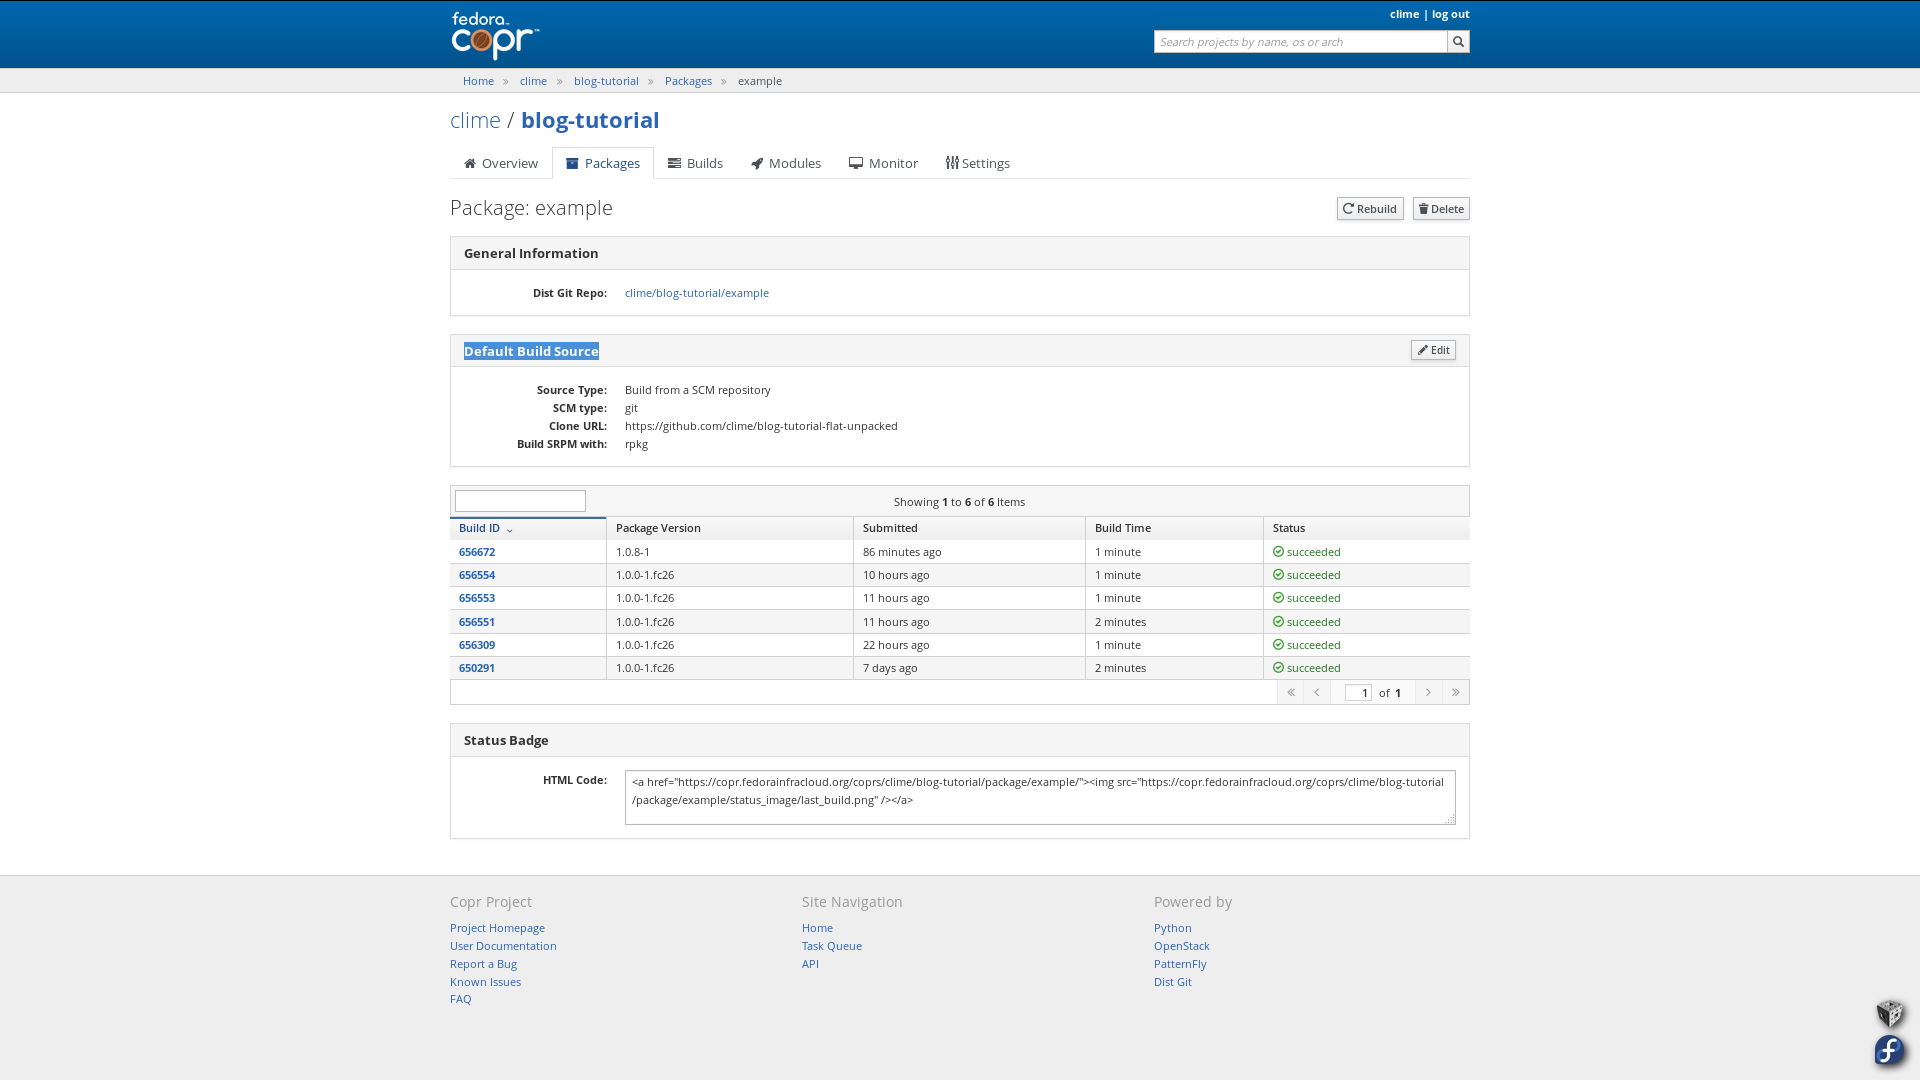
Note that here the word “package” denotes COPR package, which is different from the subpackages we were talking about before. Anyway, this COPR package allows you to easily replicate the original build with the same settings and can be also used to setup auto-rebuilding with webhooks.
If you click at Edit button in the Default Build Source section, you will get to the following screen:
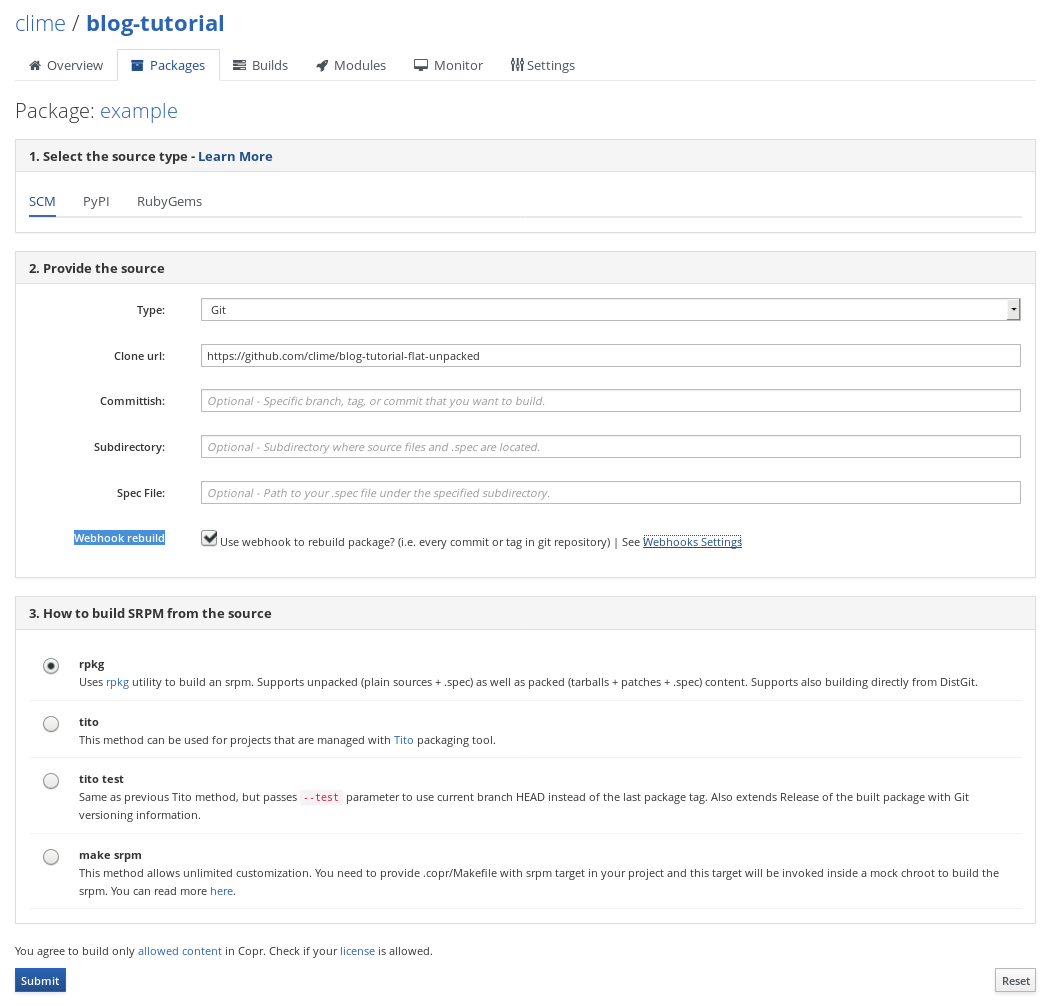
There you need to ensure that the Webhook rebuild checkbox is being checked.
Finally, you need to follow the Settings -> Webhooks instruction page for your project. Let’s show the screenshot from my example project that cannot be normally accessed by other users:

If you follow these settings specifically for Github, you should get to the screen similar to this:

So…let’s push something now into https://github.com/clime/blog-tutorial-flat-unpacked and hope it will be auto-rebuilt…
https://copr.fedorainfracloud.org/coprs/clime/blog-tutorial/build/656698/
\o/
(At least the build has started, maybe it will fail)
Can I do all this by using command-line?
Yes, you can! But you need the latest python3-copr and copr-cli packages available now only in @copr/copr repo. They should land in Fedora soon, however. If you have dnf-plugins-core installed, then you can do the following to install the latest COPR client tools (also follow the instructions here https://copr.fedorainfracloud.org/api/ to get API token):
# dnf copr enable -y @copr/copr
# dnf install -y python3-copr copr-cli --best
and then…
$ copr-cli create myproject --chroot fedora-26-x86_64
New project was successfully created.
$ copr-cli buildscm myproject --clone-url https://github.com/clime/blog-tutorial-flat-unpacked
Build was added to myproject:
    https://copr.fedorainfracloud.org/coprs/build/656705/
Of course, you can also setup the webhook with the copr-cli client but that’s already a bit beyond the reach of this tutorial. See man copr-cli and the package interface for instructions how to do it.
Epilog
Well, this is a bit long tutorial but underlyingly, it’s all about the idea that you can just smack any Git or SVN URL into the Clone URL field and that’s it (except clicking the Build button of course). There are many more options but it’s up to you if you use them or not. Oh yeah…one more thing…If you try to use the rpkg tool and install it from Fedora, it won’t work because the Fedora version is very outdated. Update is coming soon but you can find an up-to-date version at https://copr.fedorainfracloud.org/coprs/clime/rpkg-client/. This latest version allows building directly from Fedora DistGit forks.